
How To Make Chocolate Covered Strawberries
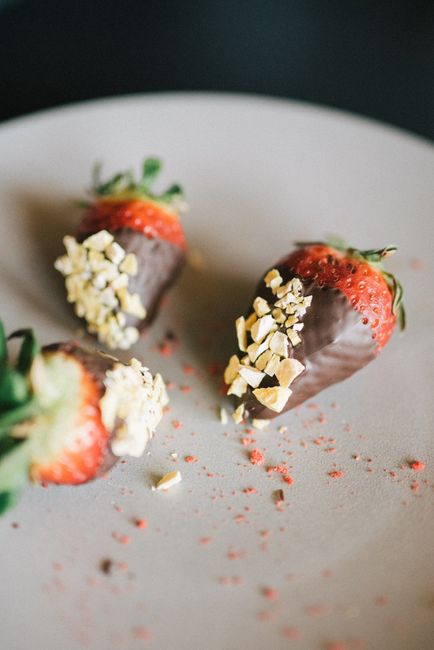
Mastering the Art of Chocolate Covered Strawberries: A Comprehensive Guide
The allure of chocolate-covered strawberries is undeniable. This simple yet elegant treat combines the natural sweetness of ripe fruit with the decadent richness of melted chocolate, creating a sensory experience that is both comforting and sophisticated. Achieving perfection with this dessert, however, involves more than just dipping. Understanding the nuances of ingredient selection, chocolate tempering, and proper technique is crucial for producing visually appealing and deliciously satisfying results. This comprehensive guide will demystify the process, empowering you to create professional-quality chocolate-covered strawberries at home, catering to both personal indulgence and impressive entertaining. We will delve into the science behind successful chocolate coating, explore various chocolate types and their applications, and provide step-by-step instructions for achieving flawless dipped strawberries every time.
The foundation of exceptional chocolate-covered strawberries lies in the quality of the ingredients. Begin with the stars of the show: strawberries. Opt for fresh, firm, and ripe strawberries that are free from blemishes or soft spots. Their size is a matter of personal preference, but consider that smaller strawberries are easier to handle and coat evenly. The ideal strawberry will have a vibrant red hue and a slightly sweet aroma. Wash them thoroughly under cool running water, ensuring to remove any dirt or debris. Crucially, after washing, allow them to air dry completely on a clean towel or paper towels. Any residual moisture on the strawberry’s surface will prevent the chocolate from adhering properly, leading to a patchy or streaky coating, and can even cause the chocolate to seize, turning grainy and unappealing. Some enthusiasts recommend gently patting them dry with a paper towel after air drying to ensure maximum dryness.
The second critical component is, of course, the chocolate. The type of chocolate you choose significantly impacts the final flavor, texture, and appearance. For a classic and robust flavor, dark chocolate with a cocoa content of 60% or higher is an excellent choice. Its slight bitterness perfectly complements the sweetness of the strawberries. Milk chocolate offers a creamier and sweeter profile, appealing to a wider audience, while white chocolate provides a visually striking contrast and a sweet, vanilla-infused taste. Beyond these basic categories, consider the quality of the chocolate. Using couverture chocolate, which contains a higher percentage of cocoa butter, will result in a smoother melt and a more desirable snap when bitten. Compound chocolate, often found in candy melts, is an easier option as it doesn’t require tempering, but it typically lacks the nuanced flavor and glossy finish of real chocolate. For the best results, opt for high-quality chocolate chips, bars, or wafers.
Melting the chocolate is a delicate process that requires patience and control. Overheating chocolate can lead to scorching and a burnt flavor, while uneven heating can result in a clumpy texture. The most reliable method for melting chocolate is the double boiler. Fill the bottom pot of a double boiler with about an inch of water, ensuring that the water level does not touch the bottom of the top pot. Place the chocolate, broken into small pieces or using chips/wafers, into the top pot. Heat the water over low to medium heat, stirring the chocolate constantly with a silicone spatula until it is smooth and completely melted. The gentle, indirect heat prevents the chocolate from burning. Alternatively, you can melt chocolate in the microwave. Place the chocolate in a microwave-safe bowl and heat in 20-second intervals, stirring thoroughly after each interval. Be vigilant, as chocolate can melt quickly and unexpectedly in the microwave. The goal is to achieve a fluid, glossy consistency.
For a truly professional finish and that satisfying "snap" when you bite into the strawberry, tempering the chocolate is essential. Tempering is a process of controlled heating and cooling that aligns the cocoa butter crystals within the chocolate. Untempered melted chocolate will result in a dull, soft coating that can bloom (develop white streaks) and have a crumbly texture. There are several tempering methods, but the seeding method is quite popular and effective. After melting your chocolate (typically around 115-120°F for dark chocolate, 110-115°F for milk chocolate, and 105-110°F for white chocolate), remove about two-thirds of it from the heat and set it aside. Stir the remaining one-third of the chocolate until it cools to around 80-85°F. Then, gradually add the reserved melted chocolate back into the cooled portion, stirring continuously until it is fully incorporated and the temperature reaches the desired tempering range (around 88-90°F for dark, 86-88°F for milk, and 83-85°F for white). Constant stirring is key to maintaining the correct temperature and crystal structure. For those who prefer a simpler approach, a thermometer is a valuable tool for accurately monitoring chocolate temperatures during tempering.
Once the chocolate is properly melted and, if tempering, has reached its optimal temperature, it’s time for the dipping process. Ensure your dried strawberries are still attached to their stems, as these will serve as convenient handles for dipping and drying. Holding a strawberry by its stem, gently dip it into the melted chocolate, submerging about two-thirds of the fruit. Allow any excess chocolate to drip back into the bowl. A slight swirl or tilt of the strawberry can help distribute the chocolate evenly. Avoid over-dipping, which can result in a thick, uneven coating. For a cleaner drip, you can gently tap the strawberry against the side of the bowl. Some prefer to use a toothpick inserted into the strawberry for dipping, but this requires carefully removing the toothpick and filling the resulting hole.
After dipping, the chocolate-covered strawberries need to set. The most common method is to place them on parchment paper or a silicone baking mat-lined baking sheet. This prevents them from sticking and allows for easy removal once hardened. Arrange the dipped strawberries with a little space between each one to prevent them from touching as the chocolate sets. Allow them to cool at room temperature for about 10-15 minutes until the chocolate begins to firm up. For faster setting and a more robust, glossy finish, refrigerate the baking sheet for 10-20 minutes, or until the chocolate is completely solid. Avoid leaving them in the refrigerator for too long, as condensation can form on the chocolate, leading to a dull appearance.
For those seeking to elevate their chocolate-covered strawberries beyond a simple dip, decorating options are plentiful. Once the base chocolate layer has set, you can drizzle contrasting melted chocolate (e.g., white chocolate on dark chocolate strawberries, or vice versa) using a piping bag with a fine tip or a fork. Edible glitter, sprinkles, or finely chopped nuts can be applied to the still-wet chocolate for added texture and visual appeal. Small edible decorations, such as candy pearls or edible flowers, can also be strategically placed. If you’ve used a dark or milk chocolate base, consider a white chocolate drizzle for a classic and elegant look. For a more festive touch, use colored candy melts to create vibrant patterns.
Proper storage is crucial to maintain the quality and appearance of your chocolate-covered strawberries. They are best enjoyed within 1-2 days of being made. Store them in a single layer in an airtight container in the refrigerator. It is advisable to place a paper towel in the bottom of the container to absorb any excess moisture. Avoid stacking them, as this can cause the chocolate to crack or stick together. When serving, allow them to sit at room temperature for about 15-20 minutes before serving to allow the chocolate to soften slightly, enhancing the flavor and texture.
Troubleshooting common issues is an integral part of mastering any culinary technique. If your chocolate is seizing (becoming thick and grainy), it’s likely due to a small amount of water entering the melted chocolate. While it’s difficult to fully recover seized chocolate, you can sometimes add a tablespoon of vegetable oil or melted cocoa butter to a small portion of the seized chocolate and try to blend it into the rest, but the texture will likely be compromised. If the chocolate coating is dull and streaky, it indicates that the chocolate was not properly tempered or that it overheated. Bloom, the white powdery or streaky appearance, is often caused by fat or sugar migration, usually due to improper storage or fluctuations in temperature.
Variations on the classic chocolate-covered strawberry abound. Consider infusing your melted chocolate with a touch of espresso powder for a mocha-infused treat, or a few drops of peppermint extract for a refreshing twist. A hint of chili powder can add an unexpected kick for the adventurous palate. For a truly indulgent experience, consider coating the strawberries in a layer of caramel before dipping them in chocolate, creating a decadent chocolate-caramel strawberry. You can also experiment with different types of chocolate coatings, such as marbled chocolate, which can be achieved by swirling two colors of melted, tempered chocolate together before dipping.
The seasonality of strawberries means that these delightful treats are often associated with holidays like Valentine’s Day and Mother’s Day, but their appeal transcends any specific occasion. They are a perfect addition to dessert buffets, a sophisticated treat for afternoon tea, or a simple yet elegant way to impress guests. By understanding the fundamental principles of chocolate selection, melting, tempering, and application, you can consistently produce beautiful and delicious chocolate-covered strawberries that will be savored and admired. The combination of fresh, juicy strawberries and rich, smooth chocolate is a timeless pairing that, with a little attention to detail, can be elevated to an art form. Remember, practice makes perfect, and each batch will bring you closer to your ultimate chocolate-covered strawberry masterpiece.
